How to Make a Custom YouTube Banner
Your YouTube channel banner is the first thing viewers see when they visit your channel, making it a crucial element in representing your brand and setting the tone for your content. A great YouTube banner image can attract viewers looking for content like yours. In this guide, we'll explore two ways to create a YouTube banner: diving into Adobe Photoshop or taking the swift route with our YouTube banner maker.

Video Tutorial: Creating Your YouTube Banner
Check out our video tutorial below for a step-by-step guide to creating your own awesome YouTube banner! This video covers both the Photoshop method and the quick and easy banner maker option.
Table of Contents
- YouTube Banner Requirements
- Need it Now? Use Our Banner Maker
- Creating a YouTube Banner with Photoshop
- Uploading Your Banner to YouTube
- Conclusion
YouTube Banner Requirements
Before we unleash our inner design gurus, let's review YouTube's banner guidelines. These are the rules to ensure your banner looks its best across all devices:
- Recommended dimensions: 2560 × 1440 pixels
- Safe area: safe area for text and logos: 1235 × 338 pixels (the region with the highest visibility on all devices)
- Maximum file size: 6MB
For a more comprehensive look at the rules, check out YouTube's official guidelines.
Need it Now? Use Our Banner Maker

Want a visually stunning YouTube banner but short on time? Our YouTube Banner Maker is here to help. With a range of customizable templates, you can create a professional-looking banner in a snap, even without design skills.
Creating a YouTube Banner with Photoshop
For those ready for a design adventure, Adobe Photoshop offers everything you need to make a truly awesome and unique banner. Let's get started.

1. Create a New Document
- Open Adobe Photoshop.
- Go to File > New.
- Set the dimensions to Width: 2560 pixels and Height: 1440 pixels.
- Set the resolution to 72.
- Give your document a name (optional) and click Create.

2. Fill the Background
- Select a vibrant color for your background. I used the color code
#ff7b11. - Grab the Paint Bucket Tool (G or Shift + G) and click anywhere on the canvas to fill it with your chosen color.
3. Add a Gradient Fill Layer
Adding a gradient can bring more depth and visual appeal to your banner, subtly enhancing the overall design.
- Go to Layer > New Fill Layer > Gradient.

- In the dialog box, simply click OK—we'll handle the customization next.
- In the Gradient Fill options bar, click the gradient preview to open the Gradient Editor.

- Select the Color to Transparent gradient. Delete the color stop on the bottom right of the gradient. Then, select the bottom left color stop and set its color to
#ffa811.

- Fine-tune your gradient:
- Style: Linear
- Angle: 90 degrees
- Scale: 150%

4. Add a Halftone Gradient Effect
For a touch of vintage charm, let's create a halftone gradient. This can lend a subtle retro vibe to your banner's aesthetic.
- Create a new layer above your gradient fill layer. Remember, layers are our friends!

- Select the Gradient Tool (G or Shift + G).
- Make sure the gradient type is set to Radial in the Gradient Tool options bar and set the dropdown to Classic gradient.

- Click on the gradient preview to enter the Gradient Editor once again.
- Select the preset black to white gradient under Basics.

- Add two color stops at around 25% and 50%. Set the 25% color stop's color to white. Your gradient should look something like this:

- Bring up your rulers (if they aren't already visible) by pressing
Ctrl + R(Windows) orCommand + R(Mac). - Click and drag from the left ruler to add a vertical guide in the center, and repeat from the top ruler for a horizontal guide, creating a central intersection.

- With the Gradient Tool selected, hold down
Shiftand drag from the center point to the right edge of the document. This creates a perfect horizontal gradient.

- Right-click the gradient layer and select Convert to Smart Object. This magical step allows for non-destructive editing.

- Go to Filter > Pixelate > Color Halftone. Set the Max. Radius to 32 pixels and leave the remaining settings at their default values.

- Change the layer's blending mode to Soft Light, which will help to blend the effect with your background.

- Finally, tone down the intensity slightly by reducing the Opacity to 20%.

5. Add Safe Zone Guidelines
Since YouTube dynamically adjusts banners for different devices (sometimes with a penchant for awkward cropping), it's best to add safe zone guidelines. This ensures essential elements like your channel name remain visible regardless of the screen size.
- First go to View > Guides > Clear Guides.
- Next, navigate to View > Guides > New Guide Layout.
- Input the following settings:

- Columns: 0, unchecked
- Rows: 0, unchecked
- Margin: checked, Left: 507px, Right: 507px, Top: 509px, Bottom: 508px
- Click OK, and your safe zone will appear.

6. Add Your Channel Name and Tagline
Now it's time to introduce the star of the show: your channel name. Let's make it prominent and eye-catching.
- Select the Horizontal Type Tool (T).
- I'm using the free Florida Vibes font.
- Click within the safe zone and confidently type your channel name.
- If resizing is needed, use the Move Tool (V) while holding
Shiftto maintain proportions while dragging the corner handles. - Set your text color to white, creating a nice contrast against the vibrant background.

- Add a touch of visual interest by selecting the text layer and clicking the Warp Text icon in the options bar at the top of the program.

- Select Arc from the Style dropdown menu and set the Bend to a gentle 8.

- Repeat these steps to add your tagline below, use a contrasting color like
#ff6600. Don't apply the text warp to the tagline text.

7. Align and Group the Text Layers
Let's ensure our text is perfectly positioned. After all, a touch of alignment can go a long way in design.
- Select both your channel name and tagline text layers in the Layers panel by Shift clicking each layer.

- Press
Ctrl + A(Windows) orCommand + A(Mac) to select the entire canvas. Select the Move Tool (V). - Click the Align Horizontal Centers icon in the options bar.

- Deselect by pressing
Ctrl + D(Windows) orCommand + D(Mac). - Make any minor adjustments to the tagline's vertical position using the Move Tool (V) if needed.
- Group the text layers for easier handling by selecting both and pressing
Ctrl + G(Windows) orCommand + G(Mac).

- With the group selected, press
Ctrl + A(Windows) orCommand + A(Mac) once more to select the canvas. Select the Move Tool (V). - Click the Align Vertical Centers icon. Your text group is now perfectly centered within the canvas.

- Press
Ctrl + D(Windows) orCommand + D(Mac) to deselect and proceed.
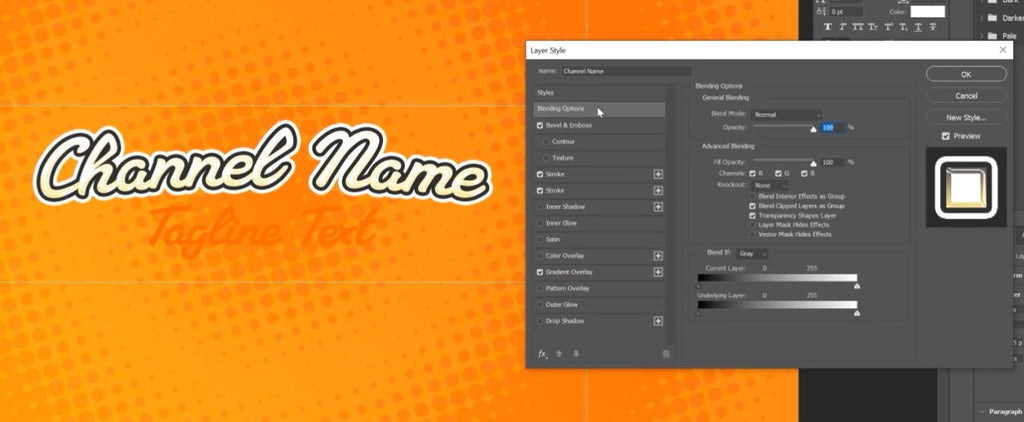
8. Add Layer Styles to the Channel Name
Here's where we can get creative and add some personality to your channel name using layer styles.
- Double-click the channel name text layer to open the Layer Style dialog box. Get ready for some styling fun.
- Apply the following layer styles:
-
Stroke:
- Size: 9px
- Position: Outside
- Blend Mode: Normal
- Opacity: 100%
- Color:
#2f2f2f
-
Stroke (yes, another one!):
- Size: 18px
- Position: Outside
- Blend Mode: Normal
- Opacity: 100%
- Color: White
-
Gradient Overlay:

- Blend Mode: Normal
- Opacity: 100%
- Gradient:
- Start with the preset Basics Foreground to Transparent gradient
- Delete the bottom right color stop if there is one
- Left color stop:
#ffea97
- Style: Linear
- Angle: 90 degrees
- Scale: 119%
- Uncheck Reverse
- Check Align with Layer
-
Bevel & Emboss:
- Style: Inner Bevel
- Technique: Smooth
- Depth: 100%
- Direction: Up
- Size: 10px
- Soften: 1px
- Angle: -130 degrees
- Altitude: 42 degrees
- Gloss Contour: Ring - Double (Looks like two spikes)
- Highlight Mode: Linear Dodge (Add)
- Highlight Color: White
- Shadow Mode: Opacity: 0%
-
Stroke:

9. Copy and Paste Layer Styles to the Tagline
Let's save ourselves some time and apply those stylish layer styles to our tagline.
- Right-click on the channel name text layer and select Copy Layer Style.
- Right-click the tagline text layer and select Paste Layer Style.
- Double-click the right side of the tagline text layer to open the Layer Style dialog box. Time for a few adjustments.
- Here's what we'll modify:
- Uncheck the box for Gradient Overlay to give the tagline its own subtle look.
- Adjust the second Stroke's size to 16px.
- Fine-tune the Bevel & Emboss settings:
- Angle: 64 degrees
- Altitude: 32 degrees
- Gloss Contour: Cone
- Highlight Mode: Opacity: 13%

10. Add Stylized Triangle Shapes
Incorporating shapes is a great way to introduce visual interest. Let's add some stylized triangles to our banner.
- Create a new group below the text group. Organization is key, my friend!

- Select the Polygon Tool (U), which you might find hiding behind the Rectangle Tool.

- Set the following options in the options bar:

- Sides: 3 (it's all about triangles today)
- Radius: 20
- Star Ratio: 50%
- Check Smooth Star Indents
- Fill: White
- Stroke: None
- Click and drag while holding down
Shiftto create a perfectly proportioned triangle on your canvas. - Let's give this triangle some of that layer style love! Right-click on the channel name text layer and select Copy Layer Style.
- Now, right-click on the triangle group and select Paste Layer Style.
- Double-click the triangle group to open its Layer Style dialog box—we have a few small adjustments to make.
- Click the checkbox icon next to the second Stroke layer style to disable it.
- Select the first Stroke layer style and change the color to
#ff6600. - Select the triangle layer and modify the Star Indents to 25% in the Properties window. Subtle changes can make a big difference!

- Use the Move Tool (V) to reposition the triangle to your liking, holding
Shiftwhile dragging to constrain movement. - To create more visual interest, duplicate your triangle by holding down
Altwhile dragging the layer in your Layers panel. Do this a few times for good measure. - Reposition, resize, and even rotate those duplicated triangles to create a dynamic composition that best reflects your channel's vibe.

- Lastly, select each triangle one-by-one, then in the properties window, drag up the rounded corners to the max for each triangle to make them more rounded and polished looking.

11. Save Your Banner
You've reached the finish line! Time to save your creation and share it with the world.
- Go to File > Save As.
- Choose Photoshop (.PSD) as the format and save your file. This preserves all your layers and edits for future tweaks. It’s always a good idea to have a master copy.
- Now, let's create a version for upload. Go to File > Save As again.
- Select PNG as the file format this time.
- Ensure the file size is under that dreaded 6MB limit.
- Click Save, and give yourself a well-deserved pat on the back!
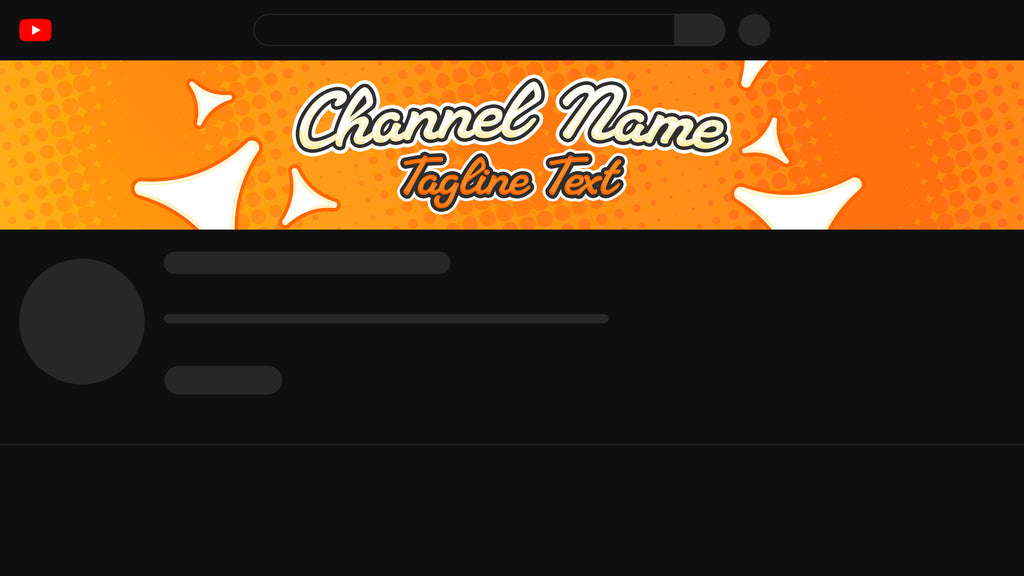
Uploading Your Banner to YouTube
Your banner is ready for its debut! Let's get it up on your YouTube channel.
- Sign in to your YouTube account.
- Click your profile icon and go to Your Channel.
- Select Customize Channel.
- Click the banner area and upload your newly designed channel banner.
- Adjust the banner's positioning if needed and hit Done.
Conclusion
Congratulations on creating your own awesome YouTube banner! You've taken a significant step in enhancing your channel's visual appeal and making it easier for people to find your content. Hopefully, you've also learned a bit about Adobe Photoshop. Thanks for reading to the end!