How to Add a Custom Minecraft Server Icon
Adding a server icon to your Minecraft server is easy. You'll also attract more players and look more professional by having an awesome icon! In this tutorial, we'll show you how to add an icon, as well as how to create a custom icon from scratch.
Server Icon Templates
Interested in getting a high quality server icon quickly? Check out our icon maker with over 70 icon designs!
Adding an icon to your server
Before trying to add a server icon, make sure you have downloaded the Minecraft Server JAR from the official Minecraft website. If you use a server host, log into your server dashboard and use FTP to add the icon to your server.
-
Find an image to use as the server icon. You can use Google to find an image to use as an icon, create your own custom icon, or use one of our server icon templates.
-
Make sure the icon size is 64x64 pixels and the file type is PNG. You can resize and convert images to PNG by using online tools like Simple Image Resizer.
-
Once your icon's size is 64x64 pixels and the file type is PNG, rename the icon file to 'server-icon'. Make sure you copy the text exactly or it will not work.
-
Move the server-icon.png image into your server's main folder.

Add the server icon to your main server folder. -
After restarting your server, check the Multiplayer server list. You should now see your server's brand-new icon!
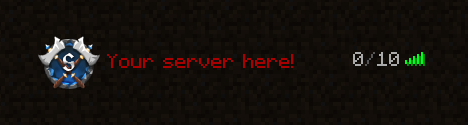
This icon design is available from our icon maker.

That's all there is to it! You've made your server look much more professional, as well as increased the chance for players to join. If you need to change your server icon in the future, simply swap out the 'server-icon.png' image with a different one. Next, we'll learn how to make a custom icon from scratch!
Creating a custom server icon
-
Step 1: Create a New File
Open Photoshop, then choose File > New.
-
Step 2: Set Canvas Dimensions
For the width and height, type 64 pixels. Make sure it is 64 pixels, not another unit of measurement, such as inches. That would be one massive server icon!
-
Step 3: Set Resolution
Set the 'Resolution' to 72 pixels/inch.
-
Click 'Create'. You should see a blank square.
-
Step 4: Choose a Background Color
Let's start by picking a background color. I've picked blue, but you can pick any color you'd like.
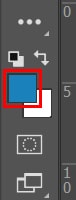
Choose a background color in your image editor. -
Unlock the Background by clicking the lock.
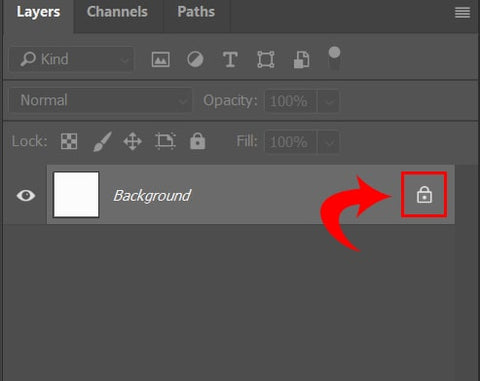
Unlock the background layer to begin editing. -
Press Alt + Delete to fill the background with the selected color.

The canvas is now filled with the selected color. -
Step 5: Add a Stripe
Let's add a stripe to the center. Select a brighter color, then add a new layer by pressing Shift + Ctrl + N.
-
Select the Rectangular Marquee Tool (M). Click and drag to create a rectangle. Once the rectangle is the correct size, release the mouse.
-
Press Alt + Delete to fill the rectangle with the color you selected.

A bright stripe adds a simple design element. -
Press Ctrl + D to deselect the rectangle.
-
Step 6: Add a Gradient
Let's add a fancy gradient effect! Create another new layer by pressing Shift + Ctrl + N.
-
Select the Gradient Tool (G).
-
Choose a white color from the color picker.
-
Copy these settings for the Gradient Tool in the top-left corner.
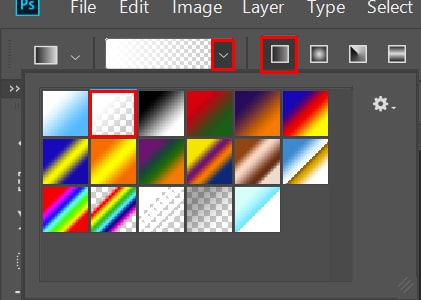
Use these settings for a transparent-to-white gradient. -
Now, drag from the top of the icon down to the bottom. You should see a white fading gradient appear.
-
Set 'Layer 3' blend mode to 'Overlay' and the opacity to 80%.
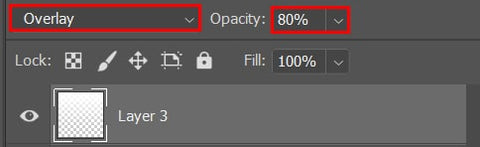
Adjust the layer's blend mode and opacity. -
Your icon should now look something like this:
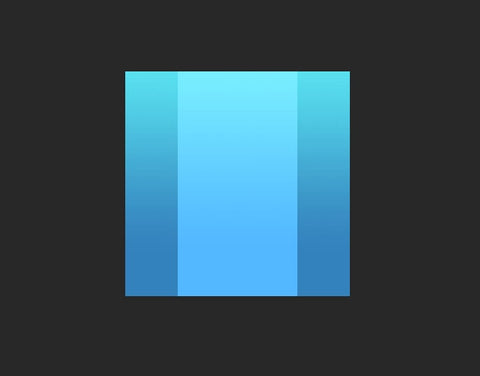
The gradient adds a nice lighting effect. -
Step 7: Add Text
Finally, let's add some text! Choose the Horizontal Type Tool (T).
-
Click in the center of the screen and start typing text. For our example, I've used the free Norwester font.
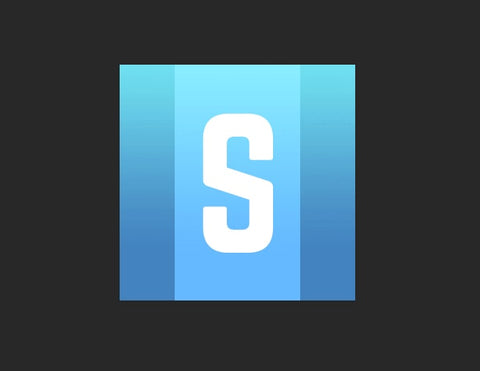
The final icon with a custom font added. -
Step 8: Save Your Icon
When you're ready to save your new server icon, click File > Save As. Make sure to save as a PNG and name it 'server-icon'. If you plan to edit the icon again in the future, make sure to also save it as a PSD file so you can open it in Photoshop again!


To add more complex styling to the icon, here are some ideas to help you out:
- Add layer styles to the letter to make it pop out more! Here's a good layer styles tutorial that will teach you all you need to know!
- Add a texture to the background: Here's a good tutorial for adding a background texture!
You made it!
We hope this tutorial has taught you everything you need to know about server icons. If you have any questions, feel free to get in touch with us at contact@woodpunchsgraphics.com. We've got years of experience with graphic design, and we're glad to help.
5 comments
This worked perfectly on my UHC server!
it works on 1.15.2 f*cking liars
It doesnt work for 1.15.
It doesnt work for 1.15.
K